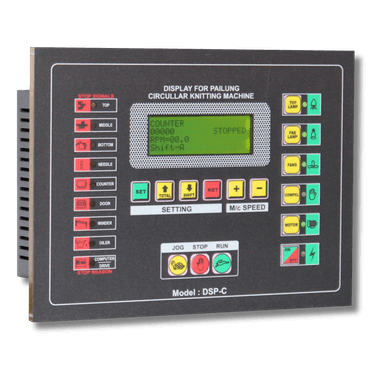
DSP-C Touch Screen Controller
Replace your Pailung machine's original touch screen with the DSP-C controller. Compatible with Schneider ATV312 and Altivar 31 drives.
Tools Required
Step-by-Step Installation
Power off the machine
Disconnect the main power supply. Wait at least 2 minutes for capacitors to discharge. Verify with a multimeter that no voltage is present on the drive terminals.
Never work on live equipment. The drive stores high voltage even after power-off.
Remove the old panel
Unscrew the existing touch screen panel from the mounting bracket. Carefully label each wire before disconnecting. Take a photo of the original wiring for reference.
Label wires with masking tape and a marker. This saves time during reconnection.
Mount the DSP-C panel
The DSP-C uses the same mounting dimensions as the original Pailung panel. Secure with the provided screws. Ensure the panel sits flush against the mounting surface.
Connect the drive
Wire the DSP-C to your Schneider ATV312 or Altivar 31 drive. Follow the connection diagram for your specific drive model. Use the same wire gauge as the original installation.
If using an Altivar 31, refer to the Altivar-specific connection points shown in the diagram.
Connect the Altivar 31 (if applicable)
For Altivar 31 drives, connect according to the dedicated wiring layout. Ensure the signal wires are separated from power wires to prevent interference.
Verify connections
Double-check every connection against the overview diagram. Ensure no loose or crossed wires. Tug-test each terminal to confirm secure seating.
Incorrect wiring can damage the DSP-C and the drive. Verify before applying power.
Power on and test
Restore power to the machine. The DSP-C should display the boot screen within 3 seconds. Test RUN, STOP, and speed control functions. Verify the display matches the expected RPM and fabric length readings.
If the display does not power on, check the 24V DC supply connection first.